Saturday, July 2, 2011

Rollers and Springs... How to keep the balance

On any 2T engine that is tuned for higher performance the power band will be raised into a tighter (peak) RPM area mostly due to the addition of an expansion chamber style performance pipe and the cylinders port timings. The DiTech isn't much different but the RPM isn't raised as high as a non-direct injected engine because the stock port timings and even the 70cc kit port timings are pretty tame. The DiTech was intended to be an ultra clean fuel efficient two stroke and the stock bower band is very broad but the restricted power output  is only 3.8HP, 4.4HP derestricted.

Most performance parts available for the Piaggio based SR50 DiTech are carryovers from the carbureted days of the Piaggio and were never intended for the DiTech. There's nothing wrong with that as long as you don't use information gathered from a non-DiTech Piaggio setup to tune your DiTech.

To get the best performance from a constant velocity transmission (CVT) based two stroke scooter such as the SR50 DiTech, the optimum RPM band must be maintained throughout the entire transition of the variator as seen in this video.


To govern that RPM from start to finish with as little RPM variation as possible a combination of variator roller weight, clutch spring tension and contrast spring tension must be chosen. Each of these serve a separate purpose but 2 of them, roller weight and contrast spring tension must have a balance.

Clutch spring tension

The clutch spring tension will determine when (what RPM) the clutch shoes start to come in contact with the clutch bell, until then the engine will spin up freely and with little effort. Where the lower power band begins (RPM) is where the shoes should start to engage the clutch bell. From idle to that RPM you want the engine to rev effortlessly so by the time you start to move the engine is already at an RPM where it begins making it's best power.

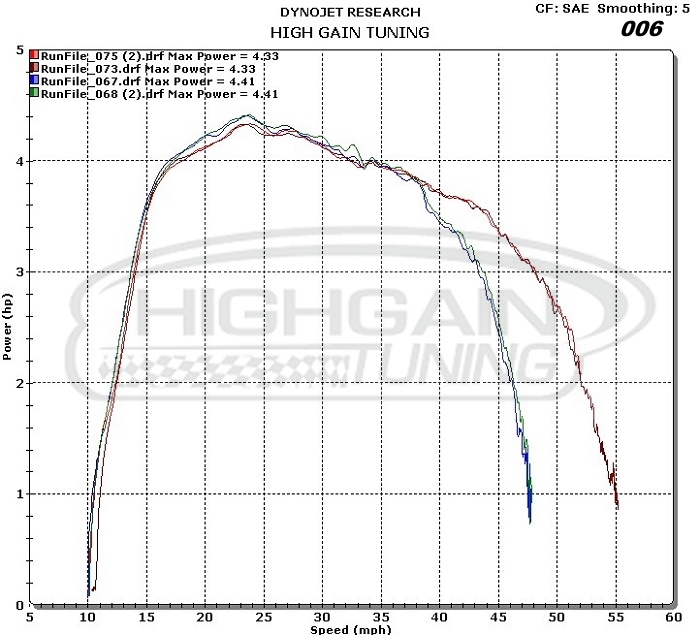
In the Dyno graph below comparing a 70cc DiTech engine to a 86cc Race engine the blue and red circles show where the lower power band begins. The blue and red ovals show where the power band peaks. Despite your riding preference, you should not let your clutch engage below the circled rpm or you will experience poor take offs and possibly never get the engine into its peak power band.


With the power band known you can better choose where you want the clutch to engage. The two extremes would be comfortable street use on one end and drag racing on the other.

A comfortable street use engagement would be at the bottom of the power band. That will allow the engine to make good power and have a smooth take off but you will feel and hear it get stronger as the rpm's get higher toward the peak. An example of that on the DiTech engine would be where the circle begins or slightly after (6500 rpm) but not before.

A drag racing setup should engage just below the peak rpm so most of the power is already made but not so high that the clutch slips. It's all or nothing when drag racing so a good engagement rpm on the race engine graph would be 10,5000.

Roller Weights

As the engine rotates, the roller weights create the centrifugal force necessary to push the front variator pulley halves together.  In their relaxed position (idle) they allow the pulley halves to relax and let the drive belt fall to its lowest range position needed for starting out.


The faster the engine rotates, the more force that will be created to push the pulley halves together and the drive belt higher up the pulley to its highest range needed for cruising.


Contrast Spring

At the rear of the transmission is the fixed pulley half, movable pulley half, contrast spring and clutch. The job of the contrast spring is to push the movable pulley half together so that the drive belt is forced to its highest position of the fixed pulley, this puts the transmission in its lowest range. Since the drive belt doesn’t stretch, that pulls the belt down into the lowest part of the variator.

If the rollers weights are responsible for pushing the drive belt one way and the contrast spring tension is responsible for pushing it the other, a balance in pressure must be maintained so the pulley halves not only transition easily and at the correct time but that the drive belt stays tight. This balance is pretty good when the scooter is stock but few of us tend to keep it that way.

Keeping it balanced


An imbalance starts as soon changes are made to the two stroke engine to make it more powerful. Since this is a CVT scooter and we cannot choose its RPM shift points manually so that it stays in the power band, we have to adjust the transmission to do it for us and do it properly.

Something as simple as changing the pipe isn't so simple on a CVT 2 stroke scooter. For an expansion chamber pipe to perform at its peak, it has to operate within a specific pulse frequency and temperature. If the temperature needs to be at a specific temperature, the manufacturer will instruct you where that should be and ways to help get it there.

For the pipes available to us the design is so that we can usually leave our engines running at their factory desired temp. This doesn't mean that part number XYZ performance pipe is going to operate the same on every engine at every location. For any performance pipe that we can add it has been tested to perform best at its fully warmed up temperature. If your going to putt around the neighborhood and never get your exhaust blistering hot, do not add a performance pipe then complain about your performance or lack of.

Some pipe manufacturers like LeoVince will include components such as stiffer clutch springs and lighter rollers to help re-balance the transmission so the owner has a better experience. Others just hope you know what the hell your doing, or don't really care.

Are you grasping this?

Now if you have been paying attention, you know why they included stiffer clutch springs and lighter roller weights. Your new pipe has a power band that is higher than your stock pipe but also starts at a higher rpm. Therefore the stiffer clutch springs will hold off the clutch engagement until the rpm's have reached the point where the pipe is making good power and won't get bogged down before it gets a chance to work.

The lighter rollers are necessary to keep the centrifugal force (balance) the same at your new (higher) operating rpm. If you fail to install the lighter rollers the force the heavier rollers create at the higher rpm will start to compress the contrast spring too quickly causing your transmission to up-shift prematurely.

Tuesday, March 1, 2011

Aprilia SR50 DiTech Transmission Tuning… Do I need an Engineering Degree?

Part 3: Making adjustments
Option (B) So, how does the average scooter owner do this?
The reality is that most riders will replace this highly specialized process with good old street testing. Although seat of the pants testing goes a long way, it can’t be relied on for small gains or the last 5% - 10% of refinement. Using a stop watch (built into your digi-dash), a marked-off flat section of road, and a consistent rider you can dial in your CVT with some trial and error. Pick a section of road that’s safe to travel, is flat and has few ruts, bumps, etc. The length of run should be just enough to allow the SR50 to just come off the CVT, where you notice the rpms starting to climb again as you heard in the video.  Make at least three pulls with your engine fully warmed up and use the average time.
Off the line the rpms should rise quickly and over-rev just slightly. This is due to the rear clutch shoes slipping and finally engaging fully. The amount of slip and the length will vary by rider weight. The only available adjustment for this on the OEM clutch is to replace the springs with different tensions. Once the rpms settle into a steady whine, they should hold steady until the pulleys run out of ratio adjustment then start rising again (rev-out point). If you cannot achieve the ideal engagement with the OEM clutch, a performance clutch such as the Malossi Delta offers not only 6 different spring choices but 3 different spring anchor points, 3 different weight positions and 2 sets of weights. Mathematically, that’s 108 setup possibilities vs the OEM’s 3.


Using a systematic trial and error method, you can then dial in your roller weights. If you notice that your SR50 really starts to accelerate harder after the rev-out point, that's an indication your CVT rpm setting is too low, go to a lighter roller weight. The reason for this is that the CVT is keeping the motor from reaching the peak power rpm, but after the pulleys run out of ratio, the engine finally drives through that "sweet spot". As you keep moving down in roller weights you'll notice your times will improve but begin to flatten out, then start to take an increase again as you pass the peak power rpm. It may be helpful to plot your times against roller weight on some graph paper and draw a curve between your points.   
Click to enlarge

Swapping out your CVT parts can be challenging. First, remove the CVT cover. Some light tapping from the edges of the cover with a soft faced hammer can help to break the seal. Finally, coaxing the cover off the two dowels make take some additional tapping, wiggling, and prying since the steel dowels have a tendency to rust slightly in the aluminum cover.
Removing the front variator is relatively simple if you have an impact wrench. If an impact is not available, various tools are made to assist this. Just spin the nut off the crankshaft and slide off the outer part of the pulley assembly. Next, remove the belt.Last, slip off the inner part of the variator. Make sure all the surfaces are fairly clean and free from burrs.
New rollers in a variety of sizes are available from High Gain Tuning and come in weights ranging from 4 grams to 8 grams per roller. The Piaggio engine uses 19mm X 15.5mm rollers and we have found 4.8gr - 5.3gr are ideal for most derestricted setups with a pipe. Lighter for 49cc and heavier for 70cc. The Morini uses 17mm X 12mm rollers and 6.8gr - 7.2gr work best, again for most derestricted engines with a pipe go lighter for 49cc and heavier for 70cc. To limit the amount of rollers you purchase, you can use three of one weight and three of another (alternating) to get just the right rpm for testing.


To install, reverse the disassembly process and torque the crank nut to the proper specs.  
The rear clutch is a bit more involved. Remove the nut holding the clutch bell onto the shaft. Once the bell is removed, you’ll notice a large nut on the rear fixed pulley assembly about 34mm or so. There are two options. One is a socket and impact wrench, the other is a special tool option. Removing this nut will allow the clutch to be removed, be cautious; it is under heavy spring pressure. With the clutch removed you will now have access to the clutch adjustments and or just springs.


The shoe springs take some finesse to remove and reinstall. When installing new springs, a heavier spring will delay the engagement rpm (higher stall) and a lighter spring will do the opposite.  And lastly, to ease the process of parts swapping, don't worry about installing all the cover screws, three or four will be more than enough for testing purposes. However, do make sure to use the cover. For two reasons: one is for safety, the other is that the cover on a Piaggio has an outboard bearing in the cover that provides critical support to the rear input shaft and the starter drive pilot.

Make sure all your adjustments are evaluated on a fully warmed up engine and transmission and don’t try to make adjustments on days when the outside temperature is extreme or outside your normal riding comfort.

Happy Tuning.

Monday, February 28, 2011

Aprilia SR50 DiTech Transmission Tuning… Do I need an Engineering Degree?

Part 2: Understanding the fundamentals

There are two options for CVT tuning, (A) a scientific method as I explained in part 1 using a 1:1 gear drive and Dynamometer or (B) a not so scientific method (The butt dyno).

Option (A) Reviewing of the power curve with the 1:1 drive will reveal where peak power occurres. The CVT assembly is then reinstalled in the SR50’s transmission. From a standing start, the throttle is again held fully open and the SR50 begins to accelerate to top speed.
If the clutch is doing its job optimally, then the rpm’s will rise, and then hold at the peak power rpm while the variator adjust the ratio, and then finally continue to rise again once the maximum range of the CVT adjustment has been exceeded. This video will let you hear and see a properly setup CVT... you will hear the rpm rise, hold then rise after the CVT has completed its transition
If the shift-speed rpm is off, then an adjustment is made to the roller weights. This acceleration profile is useful in explaining the overall function of the CVT system. As the throttle is applied from rest, the engine speed quickly rises, spinning the front variator assembly. At this stage the belt is resting against the innermost part of the front variator, and is pushed outward on the rear assembly by the squeezing force of the large torque driver spring. As the rpms rise, the rollers in the front variator are flung outward in their slots and have the effect of squeezing the front pulley halves together, thus gripping the belt and starting it to move.

Click to enlarge

As the belt moves it begins to rotate the rear clutch. The rear clutch begins to spin and accelerates as well. But the SR50 hasn't started moving yet. Inside of the rear clutch are three brake shoes that are held in place with extension springs. Once sufficient rpm is achieved centrifugal force starts to move the shoes in the rear clutch outward against spring tension of the three little extension springs. The shoes engage on the drive bell and the SR50 begins to move.

The SR50 now begins to accelerate and the rpms briefly over-rev as the shoes seat and settle in to the “shift-speed”. The elegance of the CVT is in this ability to maintain the rpm independent of road speed. When the rpms go above the shift speed then the increased centrifugal force pushes the variator rollers out farther, squeezing the front pulley halves together more, thus slightly lowering the ratio of CVT (higher gear) and therefore dragging the engine speed back down. 

Think of what happens when you shift a manual transmission from 1st to 2nd, the rpms drop. The opposite also applies, when the load increases (like going up a hill) and the rpms drop, the clutching automatically compensates by easing the front pulley halves back apart, increasing the ratio (lower gear), until the shift-speed is achieved again. In practice, this happens so quickly, and on such a minute scale, that these adjustments are completely unnoticeable.

The transition of the CVT: 

The variator roller weight is the primary means to adjust shift-speed. A higher weight will have the effect of squeezing harder at a given rpm, therefore decreasing the ratio (increasing the “gear”) and decreasing rpm. Likewise, a lower weight will increase the ratio as well as shift-speed. 
Finally, once the adjustment range of the CVT has been exceeded (when the belt is all the way out on the front pulley, the SR50 can continue to accelerate, but no longer at constant rpm. The transmission will essentially act like a manual gearbox stuck in top gear and the engine will continue to accelerate the SR50 until it runs out of power, or hits the rev limiter.  It's important to understand this since the power of your engine will fall off quickly after the peak power is achieved.


Since the Euro laws have limited scooters to 30 mph, they will reach this "rev-out" point fairly early.
To reach higher speeds will require modification of the final drive gearing such as new transmission primary or secondary gears. Otherwise the motor will be spinning at 10,000 rpm +, possibly way past its peak power, assuming the rev limiter will even let it.
The rear torque driver spring (contrast spring) also has a very specialized function which is to maintain enough tension on the belt to keep it from slipping. This also is a bit of balancing act because too much belt tension translates to inefficiency. It’s kind of like over-tightening the chain on your bicycle, power is wasted by over-stretching the belt. On the other hand, too little tension and the added power of your recent engine modification will vanish as a slipping belt won't transfer the power to the rear tire. The trick is to find just the right tension without overdoing it.
A secondary influence of the contrast spring is that it has a slight impact on shift speed since the belt tension needs to be reacted against by the front pulley halves. The higher belt tension tends to push the belt deeper into the front sheaves making the ratio higher, and revving the motor higher. Therefore, for a given desired rpm you would need to compensate with a higher roller weight to bring the rpms back down. After a contrast spring change, it’s good practice to re-optimize the roller weights.
On a factory clutch, the three shoe springs are really the only clutch parts that enjoy the freedom of rider preference. But their role in ratio adjustment is short lived once the SR50 has started to move it’s all up to the rollers and contrast spring. Installing a very tight, stiff set of springs will provide a higher "stall" speed, effectively raising the rpm during launch. Alternately, a softer set of springs will provide a little easier, smoother engagement. After the shoes have engaged, there’s little if any effect of the shoe-springs.

Aprilia SR50 DiTech Transmission Tuning… Do I need an Engineering Degree?

Part 1: Background and Basics

If you have ridden an Aprilia SR50 DiTech just once you already know it is a twist and go scooter. Twist and go meaning there is no need on your part to shift or change gears while riding and no clutch to disengage at a stop. This is achieved by using a CVT (continuously variable transmission). The first CVT friction belt transmission like the SR50 uses was patented in 1886 by Daimler and Benz and they continue to be very popular today in many industries. The SR50’s CVT is not extremely complicated but there are computer controlled CVT’s that require an engineering degree to understand. The SR50 CVT is about a 3 on a scale from 1-10 in complexity and can be maintained and setup by the owner with a little knowledge of its design.

Your Italian made SR50 was shipped to the US with the CVT already setup. Unfortunately was it not only setup in a restricted mode mechanically (to comply with European laws) it was setup to operate with an electrically restricted ECU. One of the first changes we make to the SR50 here in the US is remove the Euro restrictions, mechanical and electrical. Since the CVT was setup to operate with the restrictions in place you now will need to tune the CVT to operate best in its new derestricted mode. If you continue past the basic derestriction process and add any number of performance parts available for the SR50 you will need to re-tune the CVT.

The clutch is one of your transmissions components and before we start tuning the transmission, we need to first understand what the clutch does and why it was designed the way it was. The automatic CVT is designed to continuously vary the transmission gear ratio while holding the engine speed constant. If you were to examine the power curve of your SR50 2 stroke engine it would rise, and then fall very quickly near its peak power output.

Click to enlarge


To get the best performance from your 2 stroke SR50 you want it to operate at the rpm which peak power occurs and there is the beauty of the CVT transmission and its ability to hold the engine there. To identify this rpm the quickest on a CVT scooter a device which replaces the CVT with a 1:1 gear drive is needed. This device would be much like running a gear case transmission scooter in its final gear. A Dynamometer is the ideal place for doing this since you have no slippage after installing this and it becomes very difficult to start and stop making street testing dangerous.

When you modify your SR50’s engine by simply derestricting it and adding a performance pipe you've shifted that peak power rpm. Without readjusting the clutch to realign the controlled rpm with the new peak power, full advantage of the engine mod may not be achieved. As in a restricted SR50, the stock clutch would be adjusted to hold the engine at 5000 rpm from the factory.

If the clutch wasn't readjusted to run at the rpm necessary for the pipe to perform best only a small percentage of improvement would be gained since there's another .84HP available at 9000-10000 rpm. If the clutch was properly adjusted then max power available to the SR50 would be achieved.

Click to enlarge

Saturday, February 12, 2011

Tuning the Aprilia SR50 Factory... where do I start?


As shipped to US Aprilia Dealers, the SR50 Factory is mechanically and electrically restricted to meet European homologation requirements. In the US we do not have to meet those requirements therefore the first step in tuning the SR50 is to remove the electrical and mechanical restrictions that were installed at the factory. The 1999-2007 Aprilia SR50 with the Morini DiTech engine has 2 restrictions, the 2009 and forward SR50 with the Piaggio engine has 3.


The first restriction is in the programming of the ECU (Electronic Control Module). The Factory loaded software delivers less fuel and an ignition timing curve that limits the horse power to about 3.8 at the rear wheel.


Click to enlarge


The software can be updated to what is known as "Development" by your Aprilia Dealer via on-board by taking them your SR50 or High Gain Tuning via off-board by shipping them your ECU. You may experience difficulty in getting the Aprilia Dealer to perform this function. Many owners are being told lately that they either cannot derestrict the 2009 and newer SR50's or that they do not need to be derestricted because they are now being shipped to the US without restrictions. If the Dealer chooses not to or cannot do this, that is their choice. To say they are being shipped to the US Aprilia Dealers already derestricted is false. The 2009 Piaggio Purejet and forward models without a doubt perform better than the Franco Morini based engine which may have some believing they are now arriving without restrictions.


This video shows the derestricting of a 2009 SR50 ECU via the off-board method. This ECU was shipped to High Gain Tuning like many others because the Aprilia Dealer said it could not be done.


Here are the results... over .6 Horse Power increase just by derestricting the ECU! The road speed of the restricted SR50 is about 45 mph tops. We also gained a little speed but our next derestriction will help much more. 


Click to enlarge
The next 2 restrictions that can be removed are mechanical. One is a restrictor plate that sits right under the intake manifold, yup... just like NASCAR and for the same purpose, to limit air flow.  The restrictor plate has a single 15mm opening, the smallest opening found anywhere in the air induction system. We have found in Dyno testing that this 15mm restriction has no affect at the 49cc displacement. This plate is only found on the 2009 and newer Piaggio engine.

The second restriction is a small spacer, only 2.3mm thick that sits sandwiched between the variator pulley halves limiting how far they can come together. This mechanical limitation stops the drive belt from making a full transition up the variator and down into the rear fixed pulley. Here's a pic of the 2 mechanical restrictions removed as compared to a dime.

Click to enlarge

This is the result of removing the variator spacer, a 7-8 mile per hour increase.


Click to enlarge
This is a Dyno graph showing the results of all 3 restrictions removed. Six tenths of a horse power increase and 10 more miles per hour. It should also be noted that your 0-45 mph times will improve by 2 full seconds.

Click to enlarge

Click to enlarge

Saturday, February 5, 2011

New Gen III HPLV Regulator release


The High-Gain Tuning adjustable fuel pressure regulator was first designed over 2 years ago to fine tune the air / fuel mixture of the Direct Injected "DiTech" engines after any performance mods have been made while keeping the cost to a minimum. Any change to the engine will require a different air / fuel mixture than what it was programmed for to run at optimum performance.

Click to enlarge


Since the Ditech is a minimum function (has no O2 sensor feedback) computer controlled fuel system it doesn't know when you have made changes. The results are very seldom ever in your favor and the money spent provides questionable gain in performance and often a decrease in performance.

As seen in the Dyno graph above, adding a performance pipe gave the Ditech a peak HP gain but throughout the most important power band the engine became lean resulting in a large horse power dip. The HGT adjustable fuel pressure regulator not only removes the lean horse power dip but adds .8 more horse power where it's needed most.


With a carbureted engine you can change the jets to compensate for a leaner running engine when performance pipes or intake systems are added but it is a time consuming dirty task and usually hit and miss.
The High-Gain Tuning adjustable fuel pressure regulator installs quicker than a single jet change and once it's done all it takes to tune the air / fuel mixture after a mod is made is a screw adjustment. Imagine being able to change jets in a carbureted engine in 10 seconds while the engine is sitting there idling then hopping on to test the results!! Not only is it a 10 second adjustment, with the onboard fuel pressure and air pressure gauges you know instantly and exactly what change you have made and can easily document it.
High Gain Tuning continues to improve the  HGT adjustable Fuel Pressure Regulator and since its first introduction, it has seen over 10 improvements. 


New Gen III HPLV

Click to enlarge

High Gain Tuning is now testing its all new third generation HPLV (High Pressure Low Volume) adjustable fuel pressure regulator. The Gen III regulator body has a new round design CNC machined from Billet aluminum and then anodized.  It is now using a dual reinforced rubber diaphragm with a high precision stainless steel pivoting disc seat. This new internal design has an extremely accurate hold pressure with minimum pressure change over a wide range of temperatures.

Having a round design, we are not limited to gauge placement and have located the liquid filled fuel pressure gauge out front and the new high quality air pressure gauge just off to the side. This allows both gauges to be viewed together while making adjustments and diagnosing issues. The body now has an optional port to easily attach a sending unit for an additional dash mounted electronic gauge.

The New Gen III HPLV regulator will be offered in Black, Red and a Clear anodized finish with easy serviceable quick connect fittings and high pressure lines. A gauge and sending unit accessory will also be offered.

Click to enlarge

Thursday, February 3, 2011

LeoVince Pipe Shoot-out @ 49cc

The New ZX-R

With the newest release from LeoVince in performance pipes for the Aprilia SR50 Ditech, the LeoVince ZX-R,  we have been anxious to see how it stacked up against the LeoVince ZX and the LeoVince GP offerings. It's rumored the ZX will be replaced permanently by the new ZX-R later this year or whenever they are out of ZX inventory. Upon first inspection, the silencer and the exit pipe is noticeably larger. The exit pipe of the ZX will actually fit inside the tip of the ZX-R. The silencer body sports a new Carbon Fiber wrap over a stainless steel tube. I must say this is a huge visual improvement over the Kevlar / Carbon silencer on the ZX. The label on the silencer is also adhesive rather than riveted like the ZX.


We are told that the ZX-R was introduced to be a much quieter expansion chamber and that it is. Before we had a chance to put it to the test, many were delivered to anxious SR50 owners sporting the much louder ZX looking for something that would let them get home late at night without waking up the neighborhood. The feedback we received was it was just slightly louder than the stock pipe. Other than the silencer, the pipe appears to be the same as the ZX.


First we must derestrict


Our scoot is a brand new 2009 SR50 DiTech with the 49cc Piaggio engine which we just received in the US in late 2008. The first change made was to derestrict the ECU by putting it into Dealer Development Mode with version 2.8.0 software. This has been the best running software we have tried out of the last 3 releases. This is a must before going forward with any performance enhancements and this one change alone is a big improvement. Out of the crate, the 2009 SR50 produces 3.80 HP with a limited top speed of 45 mph. Derestricting the ECU immediately pushed us up to 4.41 HP with a 3 mph speed increase.

Click on graph to enlarge

A noticeable increase in acceleration was also recorded by the Dyno.

Click on graph to enlarge

The next change before the pipe testing began was to derestrict the variator by removing the small spacer that keeps it from making a full transition. Along with the ECU electronic limits, this is what holds the scoot to 45 mph. What a difference 2.3 mm makes... another 7-8 mph

Click on graph to enlarge

This is what the 2 derestrictions  look like compared to the stock restricted run

Click on graph to enlarge


Time to test

I first removed the 5.3gr factory rollers and installed the lighter 5.1gr. rollers (package says 4.8gr.) and red clutch springs LeoVince provides with the Piaggio pipes... a nice little bonus so your not guessing where to start. 3 pulls were taken with each pipe and before testing the pipe was fully warmed up. All 9 pulls were within 30 minutes so there wasn't much change in the environmental to affect the outcome. Shop temperature didn't change by over 1 degree. The first pipe ran was the ZX-R, then the ZX and last the GP. This is what all 9 runs look like.... very closely matched with no big stand-outs.


Click on graph to enlarge


Taking the best run from each pipe, I plotted them out with our derestricted results with the factory pipe. Each pipe kept the power band very consistent with the factory pipe telling me LeoVince did their homework.


Click on graph to enlarge


The results


All 3 pipes performed quite well over the very heavy factory pipe with the ZX adding an extra 1/2 horse power over stock. The huge weight decrease alone is enough of an improvement to switch to a performance pipe. If your looking only at peak horse power, the ZX wins with a slight margin over the others. If you look closer throughout the run, they each take their turn on top. Can you feel 1/2 a horse power at that level.... yes. Can you feel 8 one hundreds of a horse power.... no. To get the ZX-R pipe as quiet as they did with little to no decrease in horse power, LeoVince did an excellent job. And how about that LeoVince GP pipe.... Stainless Steel and excellent looks with no sacrifice in performance... how'd they do that?

Wednesday, February 2, 2011